This blog highlights some of my fun and interesting experiences along the way. - AG
Thursday
Wednesday
#18 Practice Green
This is the original site of the old practice area after demolition day.

The new green was enlarged by almost 1200 sq. ft. We added a few new contours and slope as well as put in drainage.

4" gravel layer.

Seeded on May 13th with a 50/50 blend of Tyee & 007 bentgrass. Germination was first noted on May 18th.

This picture was taken October 2009 just prior to reopening the practice area.

The new green was enlarged by almost 1200 sq. ft. We added a few new contours and slope as well as put in drainage.

4" gravel layer.

Seeded on May 13th with a 50/50 blend of Tyee & 007 bentgrass. Germination was first noted on May 18th.

This picture was taken October 2009 just prior to reopening the practice area.
Tuesday
Putting Green Party
Sunday
Cart path install
We used a paving material called StaLok.

The material is loaded into a paver which lays down an even layer at your desired depth and width. At install we put down 4" which compacts to 2" when rolled with a heavy roller.


The final product is very clean and natural looking. One of the benefits of StaLok is that is blends right in with the natural surroundings.


The material is loaded into a paver which lays down an even layer at your desired depth and width. At install we put down 4" which compacts to 2" when rolled with a heavy roller.


The final product is very clean and natural looking. One of the benefits of StaLok is that is blends right in with the natural surroundings.

Saturday
Monday
Why water doesn't flow
Well it's no surprise why this area was wet spot. This is what we found in the pipe when we dug it up. The connection collapsed who knows when and has been filling up with dirt and gravel for quite some time.
To fix it we severed the connection and clean out as much debris as possible. Then we snaked the lower half of the drain and reconnected new fittings.
Notice the nice clean and neat working area. Burlap rules!
Thursday
Before and after photos
BEFORE

This picture was take Fall 1999 - Sorry the size is so small, but this pic was scanned from the original photo.
AFTER
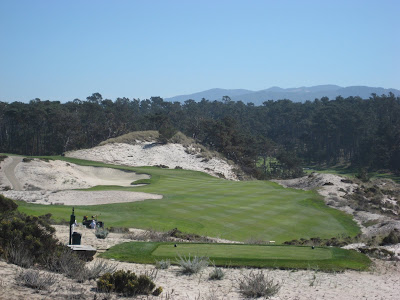
This was taken Fall 2008 - Notice how much more dune exposure there is compared to the photo from 1999.
BEFORE

Notice the cartpath in the far distance on left side of the photo. In the latter photos that same cartpath is there, but now nearly invisible as it hides in the exposure of the dunes.
AFTER

Another AFTER look

This picture was take Fall 1999 - Sorry the size is so small, but this pic was scanned from the original photo.
AFTER
This was taken Fall 2008 - Notice how much more dune exposure there is compared to the photo from 1999.
BEFORE

Notice the cartpath in the far distance on left side of the photo. In the latter photos that same cartpath is there, but now nearly invisible as it hides in the exposure of the dunes.
AFTER
Another AFTER look
Subscribe to:
Posts (Atom)


